I have had several people ask how I restored the plastic emblems on my car. I have attempted to summarize the process on this web page. Please understand that this is not necessarily the best way to restore these items, but it is the process I used. If you recognize a better process, please let me know and I will include your comments on this page.
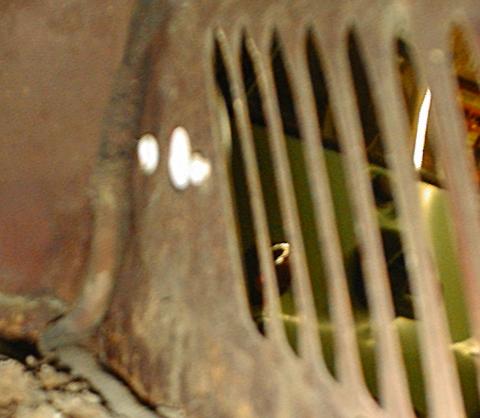
The first step in the process is to remove the emblem with out causing additional damage to the plastic. Most if not all of the emblems are installed for a "one time" use. The emblems have (2) plastic tabs that stick through the sheet metal of the car. The ends of these plastic tabs were either melted or had additional plastic applied to the ends to prevent them from coming off. The best way to remove the emblems is to either chip away the excess plastic with a knife or melt off the end of the tab level with the inside of the car's sheet metal. This can be accomplished with a red-hot piece of metal or a soldering gun. The photo to the right shows an emblem installed on the right rear fender of the car. The photo was taken from inside the rear fender well.
Area where tabs were melted at factory, melt off with hot metal or soldering gun (2 locations).
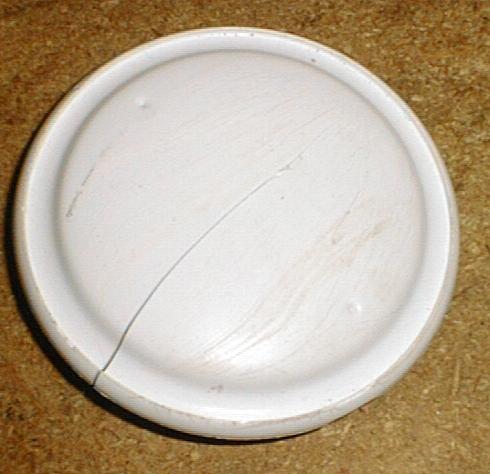
Once the emblem has been removed from the body of the car, the most difficult part is getting the (2) halves apart. This should be done with great care to prevent the base or cover from cracking. The best way to separate these halves is to use slight bending pressure around the circumference of the base. Again, great care should be taken not to bend the plastic too much.
If the base has a crack, it can be repaired with the use of a "super glue" adhesive. When making repairs to mine, I used Loctite 454 adhesive. It is important when you are repairing a crack to make sure that the surface of the plastic base that will be mounted to the car's sheet metal is flat. Do not glue the base in such a manner that the base gets warped.
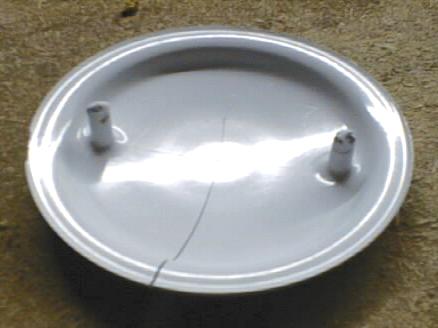
The two studs or tabs that were used to hold the emblem on to the car must be repaired before it can be remounted. This is done by grinding the existing tabs to a level that is flush with the inside of the car's sheet metal or just below. The amount of grinding should be very little if you melted off the widen area on the inside of the car. (If you removed the emblems without melting off the inside portion, you may be able to reattach using spring clips.)
The remaining tab is then drilled to accept a tap for a 4-40 machine screw. Using a #56 drill center the drill in the center of the tab. Drill a hole completely through the base material. It is assumed you have alreaded separated the top cover from the base.) Then using progressively larger drills, increase the hole size until you reach a #42 drill. The hole is threaded using a tap and a 4-40 stud is installed using loctite. Use a 4-40 nut and washer to secure the emblem to the car.
The base and plastic cover should be buffed with rouge formulated for plastics. This can be obtained at any home store like Lowes. Using a small cotton buffing wheel (3" or smaller), buff the outside edge of the base and the inside face. The buffing wheel should be running around 3000 to 3600 rpm. Much higher in speed and you will melt or burn the plastic. Slower will take much longer to accomplish the same goal. It is not necessary to buff the inside of the base completly to the edges, since this will be covered by the painted part of the cover.
After completing the buffing of the base and the outside of the plastic cover, buff the inside of the plastic cover. This should clean up the inside surface and remove any loose paint. Do not attempt to remove any paint that is still in good shape. On most of my emblems, the gold paint was in good shape and did not have to be repainted. Using Testor's model paint, touch-up or repaint the gold areas first. I used at least 2 coats of paint on all surfaces. After the gold paint has dried, cover the outside ring with black paint. Again, at least 2 coats.
The final area to paint is the blue areas within the center of the emblem. To get the correct shade of blue, I started with Testor's blue paint and added a few drops of white paint until the color matched a new BMW emblem. Take your time and care not to paint areas that should not be painted. Again 2 coats and maybe 3 will be necessary to obtain the correct coverage.
After the paint has completely dried the cover should be glued back onto the base. Take care to align the cover correctly, once it is glued, you don't get a second chance. I used loctite 454 super-glue and applied a thin coat around the entire edge of the cover prior to assembly. It is important that you get a good seal all the way around the edge so that you don't get moisture inside the emblem when the car is out in the weather or washed.